|
|
|
|||
|
|
||||
|
|
||||
| Plan: Earth Satellite | ||||
|
|
HOME | SITE MAP | FORUM | CONTACT |
|
||
|
ABOUT | MOTORS | MODELS | ARCHIVE | HISTORY | STORE | FAQ | LINKS
|
|
|
|
|
|
||||||||||||||
|
Earth Satellite
by Ray Malmström Reprinted from The Eagle Book of Spacecraft Models, 1961, p. 34 WITH THIS SIMPLE MODEL YOU CAN LAUNCH YOUR OWN SPUTNIK WITH LOTS OF VENTILATION, FLYING THIS MODEL INDOORS IS PLENTY OF FUN |
|
||||||||||||||
|
EARTH satellites (or sputniks) have been successfully launched from our planet several times, and probably while you are reading this, one of these man-made moons is busy circling the earth, collecting and sending back information about the hazards that astronauts will have to meet in their journeys in space. Our model of an earth satellite is particularly interesting, in that, unlike the other models in this book, it can be flown around a pole indoors (provided there is ample ventilation). You will not need to wait for the winter storms to finish before getting this little job into orbit. Fitted with a Jetex 50C motor, this model will circle a central pole in much the same way as the man-made satellite circles the earth. So if you are feeling like a spot of orbiting and the weather has grounded your other models, get out the building board and lets get started. Trace parts A and B on to a piece of Paint a table tennis ball with silver paint and cement in the recess in the centre of the disc. Paint piece A with clear dope, pinning it to the board while drying. Add reinforcing pieces and cement it to the top of the disc and to the table tennis ball control sphere. Cement small pieces of neoprene tubing (reinforcing the joints with tape) and push in 3" lengths of |
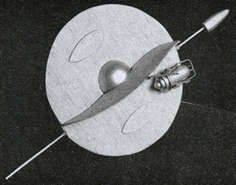 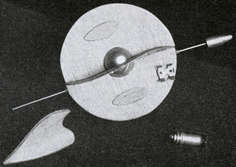 Side views, showing motor mounting and stand 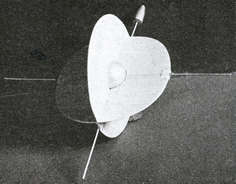 Rear view, on stand |
||||||||||||||
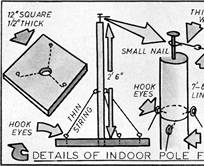
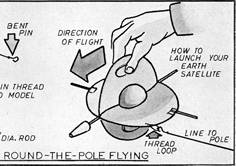
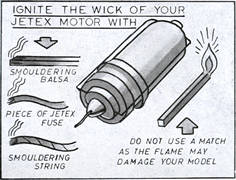
This little satellite flies on a 7-8 ft. thread line, so you will be able to fly it in any small hall or in your youth club room. However, you must see that there are plenty of windows open to provide adequate ventilation. This point is stressed by the makers of Jetex motors, and we emphasise their instructions here. Load your Jetex motor, insert it in the clip and light the igniter wick with a piece of smouldering balsa wood or string (not a match). Hold the model by the top and, with the line fairly taut, push it smartly forward as shown in the sketch on page 38 [see above]. Your satellite will orbit the pole until the charge or charges are expended. The landing is fairly hectic but, as it is an all-sheet model, repairs are extremely easy and quick, so that there is no worry on that scoreand remember that the real sputniks burn up when re-entering the earths atmosphere! |
|
- Eagle Book of Spacecraft Models, 1961 (p. 38)
|
|||||||||||||
|
|
|
||||||||||||||
Plan for Earth Satellite and construction chart
(A larger copy of the plan is also available to
view or download).  |
|||||||||||||||
|
|
|
||||||||||||||
|
|
|
|
|
|
|
|
Acknowledgements - Article and plan contributed by Brian Benson and Roger Chapman |
|
|
|
|
ABOUT | MOTORS | MODELS | ARCHIVE | HISTORY | STORE | FAQ | LINKS |
|
|
Terms of Use
|
Queries? Corrections? Additions?
Please
contact us.
|
|