|
|
|
|||
|
|
||||
|
|
||||
| Plan: Glirt | ||||
|
|
HOME | SITE MAP | FORUM | CONTACT |
|
||
|
ABOUT | MOTORS | MODELS | ARCHIVE | HISTORY | STORE | FAQ | LINKS
|
|
|
|
|
|
||||||||||||||
|
Glirt
by P A Latham Reprinted from Aeromodeller, November 1946 THE construction is quite simple and straightforward,but great care must be taken in making the soldered joints secure and in lining the wire booms up correctly. The wings are constructed from The tail is also quite straightforward. The wire brace across the cut-out piece being attached to the rest of the tailplane by strips of cement-saturated tissue holding the wire in its grooves. The fins are attached to the tailplane by cutting a slot halfway into the rear of the tailplane and another halfway into the front of the fins. The slot in the front of the fins should be wide enough to take the wire extensions from the tail booms. When the tail has been fixed to the booms, a |
Great care must be taken in making the soldered joints secure and in lining the wire booms up correctly
|
||||||||||||||
|
|
|
|||
|
The wire booms are the only things which may cause trouble. The plan clearly indicates the shape of them. In order to make a perfectly accurate job, the following method may be used :– Trace the shape onto a piece of flat wood and cut grooves to this shape with a penknife or patent modelling tool. Bend the main outline in 20 s.w.g. wire and make sure that it fits into the grooves. It can be held firmly in the grooves with bent pins used as staples. The cross-pieces, of similar wire, can then be put in : it may also be advisable to hold these with pins as they have a tendency to stick to the iron when soldering them and come out of the grooves. Make sure that both booms are exactly the same, especially the angle between the wing slot and boom. The wings are fixed to the boom by sliding them into the slot in the boom, the boom being held firm in the The model flies powered with the ordinary twopenny rocket, which is attached with two elastic bands; the heat is not sufficient to burn them. The model is launched by placing it on a flat board a foot or so wide and about four feet long. The board should be at an angle of between 30 and 50 degrees to the horizontal. If any instability is found during the take-off, strips of wood can be nailed to the board for the skids to run between. Before the model is flown, it should be balanced accurately about its fore and aft axis and then trimmed to fly straight. The model climbs at about the same angle as the take-off board till the rocket is spent. The glide is improved by finishing all the wooden parts with banana oil and sanding down smooth. Do not use explosive rockets ! |
The wire booms are the only things which may cause trouble. […] Make sure that both booms are exactly the same, especially the angle between the wing slot and boom
|
|||
|
The model climbs at about the same angle as the take-off board till the rocket is spent. The glide is improved by finishing all the wooden parts with banana oil and sanding down smooth. Do not use explosive rockets ! |
|
|||
|
|
|
|||
Plan for Glirt
(A larger copy of the plan is also available to
view or download).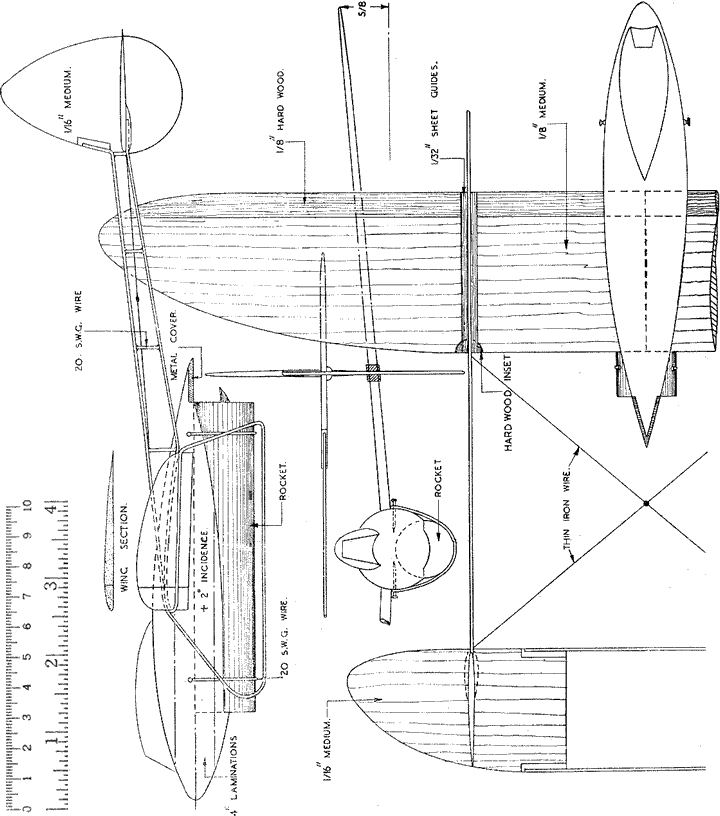 |
||||
|
|
|
|||
|
|
|
|
|
|
|
|
Acknowledgements - Article and plan contributed by Roger Simmonds |
|
|
|
|
ABOUT | MOTORS | MODELS | ARCHIVE | HISTORY | STORE | FAQ | LINKS |
|
|
Terms of Use
|
Queries? Corrections? Additions?
Please
contact us.
|
|