Reprinted with permission from Aviation Modeller International,
August 2002, pp. 104-5
Chris Strachan tests a rocket powered free flighter
from Free Flight Supplies
The kit is supplied in a clear plastic wrapper which reveals that something good is coming, as the quality of the wood is clearly something special, Actually it is just superb - obviously hand selected by an expert and beautiful. The kit is a must for that alone.
The model is designed for Jet-X 50 or catapult launch, but the object of this review was to try it for Rapier power, of which more later. First the build.
The instructions are comprehensive and someone who has never built a competition standard check glider will learn a lot by following them. One or two points are unusual, but they all work - so stick to them. Just a couple of comments here. The instruction is to finish the undersurfaces before carving the uppers. Unusual, but it certainly produced a warp-free result. However, you do need to be careful as it is all too easy to dent the finished undersurface while working on the top, especially with the lovely soft but stiff wood provided. The assembly process is well planned, so follow it, because it really works. Twin-boom designs are not the easiest to get square and true, but in this case it was no problem. The instructions are keen on Cyano and balsa cement fillets. I have to confess that I did not like this idea and used Ambroid throughout.
I set the model up for side mounting of the motor (the kit offers alternatives of side or centre mount), as I wanted to be able to try powering it with one or two Rapier L2s. The photos show the set up, with the front of the Rapiers in line with the leading edge at the root. The mountings are the simple way of installing Rapiers with a balsa cradle, a wire hook and a dental band (the method works fine and is the invention of David Deadman). A lead nose weight was built in as shown on the plan to put the C.G. in the recommended position with two empty L2s in place.
Initial glide trimming was fine, but did reveal that the leading edge is rather vulnerable to dings - shouldn't do first glide tests in the garden! A piece of thread cemented to the leading edge or one of the other tricks for giving a hard leading edge on a chuck glider would be a good idea.
The glide was set up to give a fairly wide left turn, although obviously with rocket power, you can go either way. Then for the exciting bit! First flight was with a firing Rapier on the left side and an empty one on the right. The result was a gentle left turn and a steady climb to about 20 feet. Very elegant with the motor offset to the left, keeping the turn open. So now let's try two motors. The left motor was lit about one second before the right to hold the turn open and off she went. A beautiful left climb to about 100 feet with a super smoke trail from the two motors. At the end, the right motor runs for an extra second and turns the model into the glide. Magic!
A slight problem appeared on a subsequent flying session on a typical damp, but still January day. The finish recommended in the kit is fine for dry weather, but not waterproof enough for soggy old England. The result is that the tailplane absorbs moisture and then, when the underside is heated by the rocket exhaust it curls up, giving up elevator and a stalling glide. Very puzzling at first when all seemed fine before the power flight! The solution is another coat of dope on the tail and I also added a couple of small 1/32" sheet strengthening ribs on the undersurface. The only other "problem" is that the rather smart stick-on logos are not waterproof and promptly vanished! Perhaps it is always dry in Australia!
Conclusion
A superb kit and an excellent introduction to Rapier flying. Buy one and build one today! I really ought to paint mine now - but it is a shame to hide that beautiful wood so I just did a black tissue cockpit.. Isn't life full of dilemmas!
Kit supplied by:
Free Flight Supplies,
12 Marston Lane, Eaton, Norwich, NR4 6LZ.
Price £9.00 + £1.52 p&p.
Incidentally the "Select Cut" balsa used in this kit is also stocked by Free Flight Supplies
and is highly recommended.
|
|


-
Kit header, supplied by Peter Lloyd
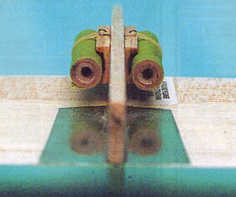
The business end of the twin Rapier motors. Note the aluminium foil fireproof patches (reflecting the motors) on
the wing underside!
-
Aviation Modeller International, Aug. 2002 p.104
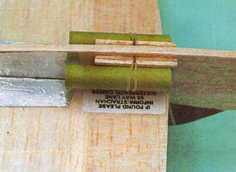
Mounting for twin Rapier L2s. The fireproof patches on
the wing underside and fuselage to the rear of the near motor are clearly visible.
-
Aviation Modeller International, Aug. 2002 p.105
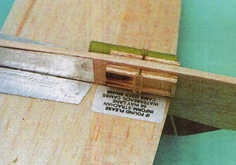
Mounting without motor in place showing 3/32" sheet backing, 3/32" sq.
surround and wIre hook with dental bond. Dental bond is 3/8" 4.5 oz.
size. Also available from Free Flight Supplies at £1.75 per pack (the posh
name is Orthodontic Elastics).
-
Aviation Modeller International, Aug. 2002 p.105
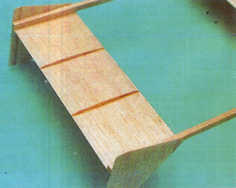
Stiffening ribs added under tailplane
-
Aviation Modeller International, Aug. 2002 p.105
|