|
|
|
|||
|
|
||||
|
|
||||
| Bill Henderson – Winners Redux | ||||
|
|
HOME | SITE MAP | FORUM | CONTACT |
|
||
|
ABOUT | MOTORS | MODELS | ARCHIVE | HISTORY | STORE | FAQ | LINKS
|
|
|
|
|
|
|||
|
Puff Adder and Vindskreenviper Redux
from Bill Henderson |
Inspired by acquiring John Emmett’s rebuild of the Jetex 200 and Jetex 350, Bill Henderson has embarked on a project to reconstruct Puff Adder and Vindskreenviper and have them again take to the skies. On this page, he chronicles his progress towards this goal. |
|||
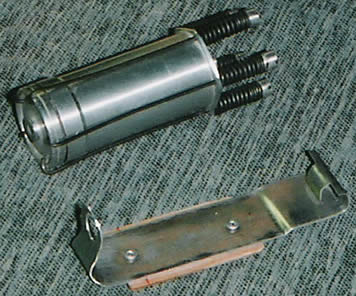 John Emmett’s inspirational Jetex 350
- Bill Henderson
|

22 May 2004 I received a package the other day from John Emmett, which contained a load of goodies – his version of a Jetex 200 with spring compression tool, spare gaskets and gauzes and a box of the original fuel. It also came with two mounting clips and a spare spring unit. Also in the package was his version of the Jetex 350 [left], again with spring compression tool, spare gaskets, gauzes together with a box of original fuel and a box of Scorpion Red Spot fuel. Similarly, it had two mounting clips and a spare spring unit. I had forgotten how big the 350 was and how powerful the springs were and I had quite a time undoing the springs to check the inside of the motor. Now that I have all the motors, I have a real urge to reproduce Puff Adder and Vindskreenviper 2. The indoor season is almost over [Ed.: Bill is an avid indoor flyer] and I will soon be drawing up plans and starting building. |
|||
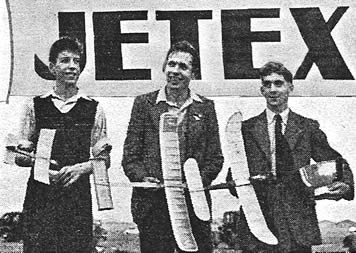 Winners of the first Jetex International (l. to r.):
- Model Aircraft, Nov. 1949 (retouched JMC)
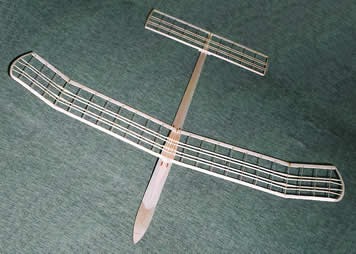
 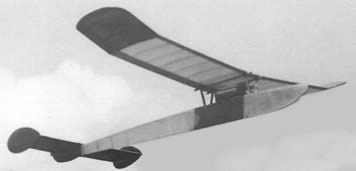 The original Puff Adder 1, Mk 2 (this first Puff Adder design went through four variations, designated ‘Marks’, before it became Vindskreenviper 1)
- Bill Henderson (retouched JMC)
 Puff Adder 1, Mk 2 –
- Bill Henderson
|
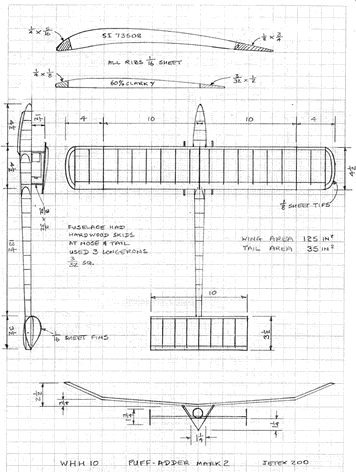
5 July 2004 I have now started to plan out and build Puff Adder, but I was a little handicapped due to having no full-size plans. I did not bring them with me [to Canada] when I left the UK, because I had all the details of the Vindskreenviper series, which were my state of the art models at that time. I remembered some details, but many items needed some creative recall based on the photos I have. First and foremost I had to recheck the major dimensions and I was able to use the photo of myself with the other winners at the first Jetex International (Model Aircraft, November 1949) [left]. This photo was almost a plan view of the model and the dimensions checked out very well. The major problem with the original model [below left] was that the motor mounting clip was screwed down under the wing. This meant that the motor was behind the model CG, requiring a lot of nose weight to achieve a good glide and the wing had to be taken off each time I wanted to reload the motor. This became my first dilemma to solve and I must admit to using a little hindsight. I had solved this problem on Vindskreenviper 1 by riveting a ply base to the motor mount and sliding this assembly into place using runners. I have therefore, elected to use the same system on what will become Puff Adder 2B. The other problem is the weak wings, due to my using no spars. This was common practice for small duration models in the late 40s and I note that Dick Twomey was using the same wing construction technique. I have used designer’s license and included a single spar in the wing and the tailplane. Another problem is that we must now have the DT fuse mounted in a snuffer tube. In the old days, we just pushed the DT fuse onto a retainer pin, but the smouldering end could drop off and start a grass/forest fire. Thus the rear end of the fuselage is now different from the original. I recognise that many of these changes would not be acceptable to SAM, but the 50+ years of model building knowledge I have acquired since 1949 will not permit me to build in the mistakes I made when I designed the model at age 18. Unfortunately, the extensive experience I have acquired building very light, indoor models is also causing me to re-evaluate some of my early design decisions, particularly as to grade and density of wood to use in various components. When the original was built, the only tissue that was available was Modelspan, which was heavy and soaked up a lot of dope. I no longer have any Modelspan available, because around 1950 I converted to Japanese Tissue that I was bringing into the UK via a Japanese pen friend. The model will, therefore, be covered using Jap tissue, but in the original red and white combination. I was in a model-making slump, having lost interest in rubber driven indoor models, both Scale and Duration. Now that I have received the Jetex 200 and 350 motors from John Emmett, the creative juices have returned and I am really enjoying recreating my early Jetex designs. 27 July 2004 |
|
|
|
||||||||||||||||||||||||||||
- all colour photographs by Bill Henderson
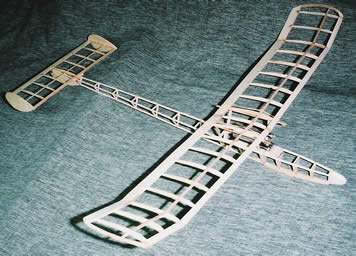
 Puff Adder 2B, showing Jetex 200 mount 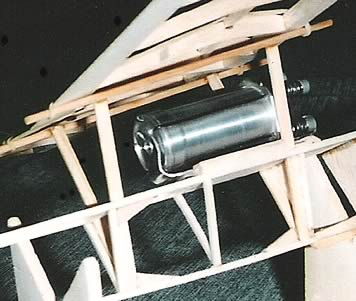 Puff Adder 2B Jetex 200 mount – detail 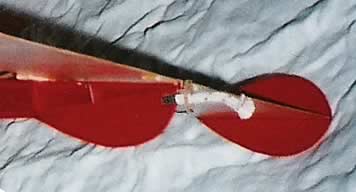 Puff Adder 2B, d/t detail 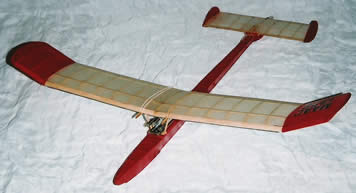 Puff Adder 2B, covered 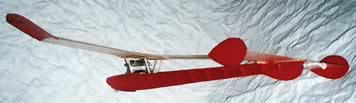 Puff Adder 2B, covered |
Puff Adder 2B is now finished and ready to fly. It has become a habit to record all of the types of wood used in my indoor models and I continued this with the new model. I never did this in any detail 50+ years ago, so I have much more comprehensive records this time. As I mentioned before, I have kept to the basic construction shown in the original
Thus the weight of this reproduction is close to the original 2.75 oz of the later versions, but is much lighter than the 3.5 oz of the original Mark 2. I am comparing apples and oranges here, because the original weights included the nose weight necessary for good glide. The new model has not been flight tested yet, but may need nose weight before I am finished. The real test will come with the first powered flight; I am using 50+-year-old Jetex fuel and it may well not ignite, let alone produce adequate thrust. We will find out later this summer. 10 August 2004 Puff Adder 2B, now complete with tip-up d/t [left], is waiting to be trimmed. I am trying to find a local area with the proverbial high grass so that I can do basic glide trimming. I have found a group of RC glider flyers who allow free-flighters to fly on their field (a grass sod-farm) so that, once I am satisfied with the glide trim, I can try powered flights, with a short DT! I am keeping a photographic record of each stage of my progress with the model and I hope that this will include the powered flights. I have also started to look at the Aeromodeller Vindskreenviper II plans [a Roman numeral was used for Aeromodeller publication] and was surprised to find a few minor errors in the notes. I am also a little surprised at some of the design sophistication, especially considering that the Grange club was non-existent when I designed and built it and I was by myself in a small room the RAE Model Engineering club let me use. But I also notice that I was not very skilful at using the different grades of balsa wood; that only came after I arrived in Canada. For instance, I nominated that the wing ribs should be 29 August 2004 I took Puff Adder 2B out to an area of tall grass I found near the Museum and got it into glide trim. This was achieved with 10 grams of nose weight, which is less that I expected. I also had to play with wing incidence and decalage and these are now closer to the original model. Flying Puff Adder under power will have to wait until October, but the delay will allow me to get the moisture content of the 200 fuel, which John Emmett sent me, down to an acceptable level. I do not have much 200 fuel, but I have a lot of Jetmaster and Tiger B fuel and this is |
||||||||||||||||||||||||||||
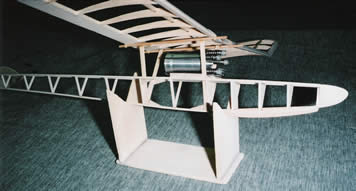
 Vindskreenviper 2B, showing mount for Jetex 350 in place 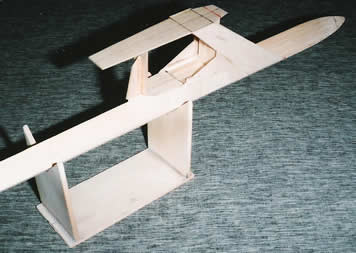 Vindskreenviper 2B – start of pylon construction 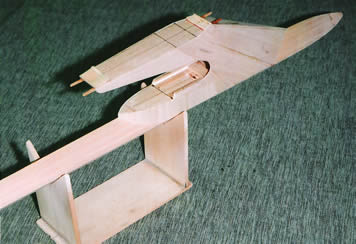 Vindskreenviper 2B – motor mount and wing mount details 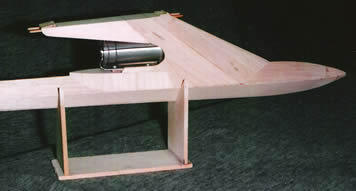 Vindskreenviper 2B – pylon with Jetex 350 in place 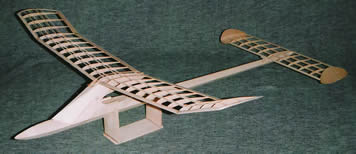 Vindskreenviper 2B, complete and uncovered |
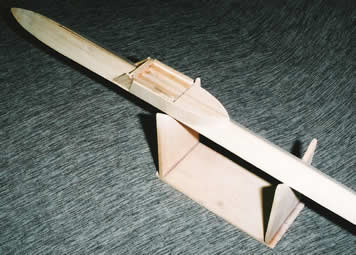
The delay will also allow me time to rebuild Vindskreenviper 2. So there are lots to do between now and the end of September. I am also thinking of rebuilding the flying surfaces for my Scorpion powered model and this will round out my stable of flyable Jetex models. 16 September 2004 Last week I suddenly got the inspiration to build Vindskreenviper 2A and the fuselage is about 2/3 complete. On looking over the Aeromodeller plan, I discovered that there are some small errors in it, mostly nomenclature, but a few details on the fuselage are incorrect. I found the latter when I compared my photo of the interior of the pylon with the details on the plan. I have followed the details in the photo and it makes for a cleaner pylon/motor mount. When I cut the sides for the fuselage, they appeared to be of the correct width, but when I built them up I ended up with a slightly narrower fuselage. This gave me a few problems with the motor mount slides and the nesting of the 350 in the pylon. By using a small plastic extrusion for the rails and pulling the motor stop back ¼" I have been able to get the motor to slide in place easily and avoid pushing the sloping walls of the pylon outwards. This is probably going to mean that I will need nose weight to get the CG in the right place, but I do have a weight box in the nose. The original flew without any nose weight! The pylon was very difficult to build and it brought back memories of the same problem on the original model. The next step is the building of the flying surfaces and the tailplane mount at the rear of the fuselage. 31 October 2004 I have not had a chance yet to fly Puff Adder 2B, in spite of some perfect days. When the perfect day arrives, I either have previously arranged appointments or my wife has the car. The weather is still very good and I am hoping for a good day next week, before the winter storms arrive. The structure for Vindskreenviper 2B is now complete and I will be covering it soon. I am very surprised how difficult it is to build, due to some very sophisticated construction techniques. I am surprised that I was able to create such a design at 19 years of age. With the size of motor and the difficulty of construction it is not surprising that very few were built. In contrast, Ian Dowsett’s designs were all very simple and were justifiably popular. 8 November 2004 I had been hoping that the weather would be co-operative and give me a chance to make the maiden flight of Puff Adder 2B, but it has not come to pass. Last Wednesday was a beautiful day with sun, light winds and everything right, but family duties called. There is some good weather forecast for next week, so maybe I will get lucky. Vindskreenviper 2B has all the structure finished and now it needs to be covered. This I will be doing gradually over the next week or so, but I think that trimming and flying will probably have to wait until next spring. 29 November 2004 |
||||||||||||||||||||||||||||
 Vindskreenviper 2B, uncovered  Vindskreenviper 2B, covered 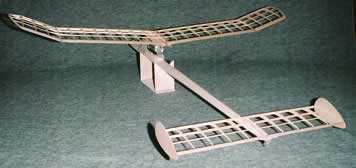 Vindskreenviper 2B, uncovered, showing motor mounted in pylon  Vindskreenviper 2B, covered, showing motor mounted |
I have started covering Vindskreenviper 2B [left], but have run into a problem. The surface area of the flying surfaces is large and doping them produces large quantities of fumes. Unfortunately my hobby room ventilation cannot cope with the fumes so they spread through the house. I would overcome this problem by doping outside in the open, but our current temperatures around 5°C and rainstorms make this impossible. So I will have to delay covering the wings until next spring. 5 April 2005 The Vindskreenviper Redux project is stalled until the weather improves and I can cover the fuselage and wings with tissue then do the doping outside to prevent clouds of dope thinner vapour drifting around the house. 25 April 2005 At last the weather has changed and for the past few days we had 15+° Celsius temperatures and I was able to cover the wings and fuselage of Vindskreenviper 2B and after water shrinking they received two coats of nitrate dope. I let the wing dry on a jig to hold the inboard panels LE and TE in line. In this it was successful, but the tips, which were not in the jig, developed a slight washout. I am not unhappy about this, because it will probably delay any tendency for tip stall and is, therefore, probably an advantage. At last with everything covered I have been able to do a weight comparison between the original and the redux version with the following interesting results:
Note that there is a significant weight reduction from 2A to 2B, in spite of the fact that the structural details are identical. I can only put the differences down to the fact that I now am very much more choosy as to the density and grain type of the balsa I use, due to my experience of building ultra light indoor models. Also 2A was covered with Modelspan, which is a heavy tissue and soaks up the dope, whereas 2B is covered with lightweight Jap tissue (which I chose not to use, even though I had some in the UK). |
||||||||||||||||||||||||||||
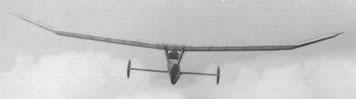
 Vindskreenviper 3 Mk 2, bird’s eye view  Vindskreenviper 3 Mk 2, flyer’s eye view  Vindskreenviper 3 Mk 2, showing mounted Scorpion motor  Vindskreenviper 3 Mk 2 – note d/t fuse |
20 May 2005 I have not had a chance to get out flying so far this spring, but I hope that will change soon. Besides completing Vindskreenviper 2B, I decided to modify the fuselage I still have for Vindskreenviper 3 Mk 2 (designed for Scorpion power), so that the wings from 2B will fit [left]. I think that the smaller areas compared to 3 Mk 2 will allow for a much better climb with the Scorpion motor and perhaps the model will fly better than the original. 26 July 2005 Now that winter is over I have been able to take Vindskreenviper 2B out to do some basic trimming. Much to my surprise it proved to be slightly nose heavy. This was corrected by adding a 1 mm shim at the stab TE and it now has a very pleasing flat glide from hand launch. This means that this new version is 28.73 grams (1 oz) lighter than the original! The next step is to test it under power and I now have access to two flying fields, but both are some distance from Toronto. Unfortunately the weather has turned very hot (33°C plus) with high humidity and has been like that for over two weeks with no relief in sight. Once the heat-wave breaks, I might get a chance to go out flying. This will be conditional on being able to cure lameness I am currently suffering in my right ankle. It certainly restricts my activities and I can only hobble slowly when I walk, which is far from the speed needed to chase free-flight models. 9 October 2010 I have had some test flights on my reconstructed Puffadder and Vindskreenviper, but nothing special to report, except that they flew moderately well with old Jetex fuel and fuse. |
||||||||||||||||||||||||||||
|
|
|||||||||||||||||||||||||||||
|
|
|
||||||||||||||||||||||||||||
|
|
|
|
|
|
|
|
Acknowledgements - Text and photographs: Bill Henderson |
|
|
|
|
ABOUT | MOTORS | MODELS | ARCHIVE | HISTORY | STORE | FAQ | LINKS |
|
|
Terms of Use
|
Queries? Corrections? Additions?
Please
contact us.
|
|