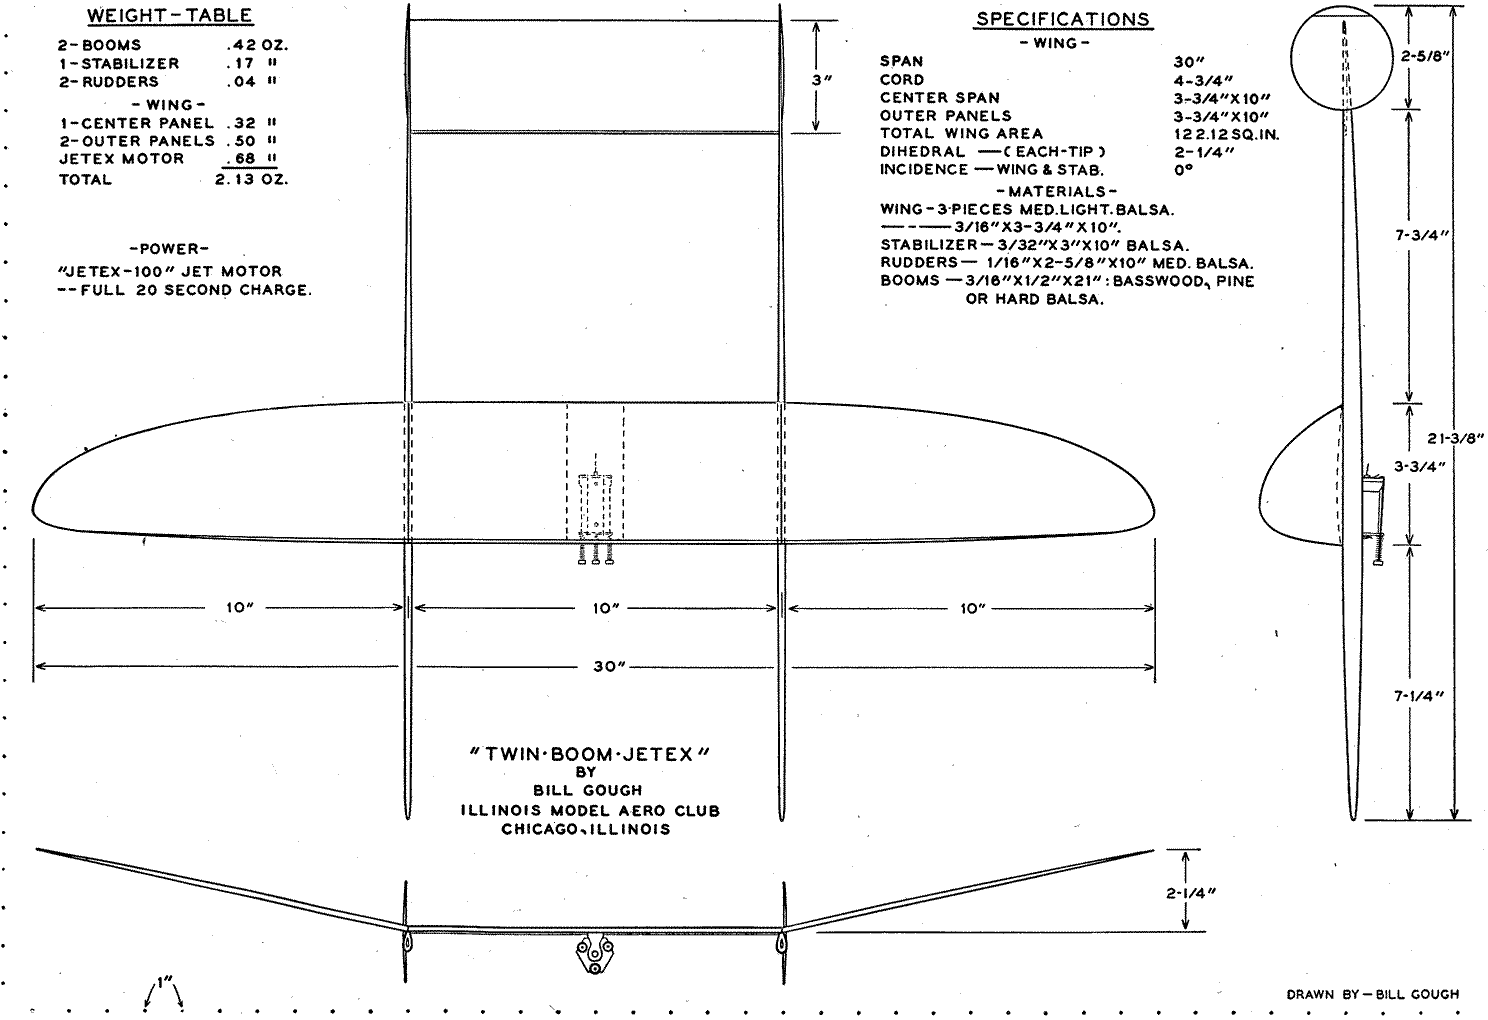
See dimensioned construction plan at end of article
Twin Boom Jetex
by Bill Gough
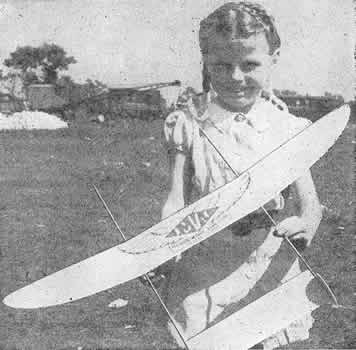
 (At right: Author's "helper" proudly displays the twin-boom speedster)
UPON receiving a Jetex 100 solid charge jet motor, the author was intrigued with its possibilities, and later set it up on a test stand with a small household fan tossing air towards the little engine for cooling. Lo and behold! The thrust output was found to be excellent for its size. It was decided to mount this jet engine on a previous design, a "high start" twin boom glider model which had been developed by the writer during the war.
Some modelers may not be familiar with the "high start" method of launching gliders, this seems to have been an East Coast development by our old friend Frank Zaic. The model is catapulted into the air with about 20' of rubber (two or more strands as desired for power), tied to 50' of string, mounted on a pole or held by hand. This power gives a reliable method of launching and altitudes are very high. However, Hi-Start has been eliminated in this article, as Jetex power is utilized instead.
CONSTRUCTION DETAILS. Our model has a 30" wing-span, per manufacturer's specifications of maximum span for the Jetex 100 engine.
Notice the scaled dots along the one side and bottom of the three view plan; a draftsman's "T square" may be used with a sharp fine-line pencil, such as 4H or GH, to rule lines across plan through dots. Scaling-up may then be accomplished by enlarging these squares. A faster method is to cut all pieces indicated to specifications on the drawing, and use the eye for general curve shapes, plus a ruler for measurements.
WING. Our wing is constructed of three medium-light balsa panels 3/16" x 3-3/4" x 10". If 4" wide balsa is too difficult to obtain, two-inch wide pieces may be cemented together and trimmed down to give the desired width. Should the balsa be hard, cut the wing airfoil down to about 1/8" thick, instead of the 3/16" thickness used with light or medium-light balsa.
Cement the three panels lightly at the dihedral joints (but without dihedral) and allow to dry. Make a cardboard or heavy paper template of wingtip panel shape, then trace this on each side. Cut to outline. Next, pin wing down flat, and cement on the 1/8" sq. basswood or soft pine strip along leading edge. When completely dry, remove pins and shape wing to airfoil section. Use rough, medium and fine sandpaper, Nos. 2, 4, 6 and 8/0 wet-or-dry, obtained at your local hardware store, for the finishing job.
Keep trailing edge fairly heavy (1/32" rounded) to prevent wing flutter, especially at the tips. Your jet model will climb very fast and any excessive tip flutter will cause it to dive in at full speed.
To keep model weight down, apply only two coats of medium thin dope on wing. Sand between coats with No. 8/0 wet-or- dry sandpaper, used dry. Follow the same procedure on all surfaces.
Next, break the lightly cemented dihedral joints, lay a sheet of waxed paper on bench and block up tips to the minimum of 2-1/4" on each tip (no less). If anything, add 1/4" to 1/2" to each tip for additional stability.
STABILIZER AND RUDDERS. The stabilizer is simple, being rectangular in shape as can be seen on the plan. Leading edge may be reinforced with 1/16" sq. basswood or pine if desired; however, if the balsa is of a fairly hard grade, this may be left aft Sand a piece 3/32" x 3" x 10" to a streamline airfoil, coat with dope, and finish same as the wing, Rudders are circular in shape and can be ruled right on the balsa sheet with a pencil compass. Inside shape of each rudder cemented to boom is flat, and the outside is sanded to an airfoil section. (See plan.)
BOOMS. Our two booms are quite easy to shape: Be careful to inspect them for straightness of grain. Boom cross section is "tear drop" in shape. Either hard balsa, basswood, or pine may be utilized nicely. Material blank size is 3/16" x 1/2" x 21". Make sure, while shaping and sanding that the top of the booms, from leading edge of wing to rear tip are as close as possible to being straight. This is important, as when the wing and stabilizer are cemented to booms, both must be at zero degrees of incidence.
ASSEMBLY. By now, some very fine pieces should be on your bench, ready for assembly. You may feel an urge to cement the works together quickly and toss it into the air to see what happens. Take it from me, a bit of slowness and care will assure that every part is lined up for flight. Since our Jet job flies fast, it is necessary to make certain, when cementing and lining up all surfaces, that they are true and strong. If any surface is out of line, such as booms with wing and tail, one wingtip higher than the other, or too much turn in rudders, a crash may result.
MOUNTING JET ENGINE. Cement the asbestos pad under wing between booms. Note side view of plan; mounted engine must have about 30 upthrust for proper climb and glide at end of power run. Either shim to lower the back of the engine with washers when mounting, or use a small taper piece 1/16" x 1/2" x 1/8" for the same effect. Jet engine is lined up straight with booms, that is, there is no side thrust only upthrust.
FLIGHT ADJUSTMENTS. About 3/8" from trailing edge, cut rudders lightly with razor blade, bend and re-cement; turn both not more than 1/16" in the same direction. Very little turn should be used in flight tests.
Glide model without the solid jet charge. Balance with modeling clay at both noses equally until a smooth Hat glide is attained. Then load charge into engine, snap onto engine mount and you are ready to fly. Up- thrust will take care of the additional nose weight of fuel charge in a power climb, and the model will assume its normal glide when the charge burns out. Launch model as illustrated. Should a friend who smokes be around, have him hold a lighted cigarette to the tip of the wick. If a match used instead. make sure that the flame is held close to wick under asbestos protective covering and not near the doped wing.
As the jet starts to hiss, count to three slowly, then launch with both hands evenly, with a slight push upwards. For the next 18 to 20 sees. your Twin Boom Jetex model will climb steeply and steadily in a wide circle until it is very high up. Motor power run and the normal glide will give a flight of 2 mins., plus any thermals that may happen along.
It is this writer's belief that the coming 1950 Nationals should have in its program a free flight Jetex powered event. Anyhow, your interest in building this ship, plus some of your own design models will certainly aid progress toward such a goal.
