by Bill Dean
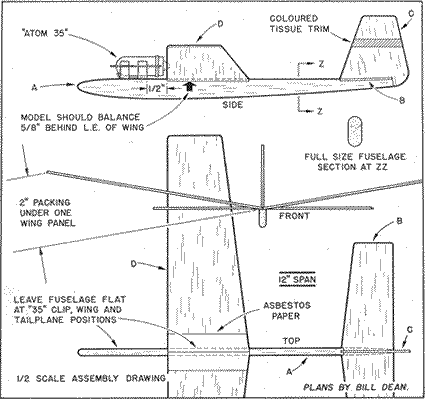
This all-sheet design for the new Jetex '35' takes only an hour to make. Asked by the Editor to design a beginner's model for the new Jetex "Atom 35 ", we decided to adopt a perfectly conventional layout and concentrate on building simplicity. After selecting the balsa sheet and sitting down at the building board, the average beginner can easily turn out one of these little models in one hour flat. Patterns are shown full size at the foot of the page, so trace them on to 3/16 in. (A) and 1/16 in. (B, C and D) sheet. Cut out the parts with a sharp razor blade and make two wing panels.
Sandpaper all parts well and round off the upper edges of the flying surfaces (except at wing roots and fin base) Carve away the fuselage corners with the exception of the motor clip and flying surface positions. Taper the fuselage at the tail end (top view) and cut a shallow "V" at the wing position. Place the wing panels on a flat surface with the roots level with the edge, then sand the roots to a slight angle for the dihedral joint. Pin one panel flat on the building board and cement the other to it, packing up the latter 2 ins.
Begin the assembly by cementing the tailplane (B) to the fuselage (A), carefully checking for correct alignment. When dry, follow with the fin (C) and the wing (D)—again making sure that the parts line up correctly with each other in the top and front views. Cement a piece of I in. wide asbestos paper to the centre section of the wing Now push a pin in the fuselage at the dihedral wing joint—5/8 in. back from the wing leading edge. Load the motor, slide it in the mounting clip and hold them both in place on top of the fuselage with a rubber band—so that the rear of the clip is 1/2 in in front of the wing L E. If the model does not balance exactly level when held by the pin, move the motor and clip to correct this—then screw in place. If desired, trim strips coloured tissue of coloured tissue may be doped in place.
Flying
As with all powered models, check the glide first. Launch on a slightly downward flight path at a point some 20-25 ft. ahead. If a stall results, add a few pins or other weight to the nose. If the model dives, gently twist up the leading edges of the wing tips. A slight turn is needed to prevent a loop under power.
When you are satisfied with the glide, light the Jetex wick, wait 3—4 seconds for the thrust to develop, then launch the model at its normal gliding speed—with the wings banked slightly in the direction of its natural turn. Erratic flight performance can usually be traced to warped flying surfaces.

